So have you ever been in a situation where you try to double-click an Excel file, and it just doesn’t open? Watch this, if I double-click File2, nothing happens. You do see the wheel going in Windows, so it’s actually working, but nothing’s happening. What’s also puzzling about this is that if you check the task bar here, Excel’s not flashing, nothing’s flashing, it’s like nothing need my attention… so what gives?
Now to understand why this is happening, let’s click the Excel icon in the taskbar. So here you can see that I was already updating a file called File1.xlsx, and the file we were trying to open is actually File2. Now what’s interesting here is that there’s only one Excel window, if you check down here. There’s just one. Where’s File2, I double-clicked it twice, why is it not opening? Well here’s the story. If you’re in the middle of updating a formula in Excel, and then you minimize, go somewhere else, work on something else, and then try to open another file, Excel can’t do anything until you conclude what you’re doing here. If I go and I actually press the red X to cancel the formula, File2 appears.
So the next time you try to open an Excel file by double-clicking it, and you don’t understand why Excel is taking so long, check it out, it might actually be what I showed you.
Hi everyone. Let’s say I needed to take a screenshot of this, what you’re seeing right here, the Google search page, but more specifically, the Web Store button and I wanted to explain to someone that hey you can remove this, you can get rid of this button. Well, the way to do that is you have to hover on it, then you press this, then you press remove. Simple, right? Well, the problem is, if I want someone to know how to do this, often what works best is having a screenshot, so if I want a screenshot, I have to kind of like hover on this, to make sure that the triple dots are visible, the button that you see here, right? But I can’t leave, because when I leave, the button leaves. So I have to stay here, okay… but now if I want a screenshot, what do I do? Well, I’m going to press Print Screen, right? Print Screen is the default way of taking screenshots, so if I go here, into Paint, and paste what I just print screened, you can see that yeah, okay, I see the triple dot icon, unforunately I also see “Web Store” some tooltip that appeared here, but I do see the triple dot icon, you know, so cool. The problem is, I do have to crop, which is extra work, I don’t really need to crop – is there a better way, perhaps?
Well, let me show you another option. Another option is to press, to hover again, right, and then press ALT + Print Screen. I press on Paint, I paste, and here you see that hey, it worked this time, great. And what’s good about ALT + Print Screen is that it only takes the window that had focus, in this case, literally the browser window, that’s cool. But again, I have to crop… why would I have to crop if don’t need to crop? Right? Is there a better way? I’ll show you a better way.
So let’s close this right now, and uh, I’m going to show you two different ways actually. The basic in Windows 10 was Snipping Tool for a very long time, the basic screenshot functionality. Snipping Tool is great, basically pop this thing up that you see right here, you can press New – and then it lets you select something, right? Select anything you want, release, and there is your screenshot pre-cropped, perfect. Now there’s just one problem, and you can see – where’s my triple dot icon? It’s missing, right? Because you need a hover state, right? You need to be hovering on that icon for it to appear. So… when I move my mouse away to press New for Snipping Tool, I lose the hover state, so I can’t see the icon anymore. How do we fix this?
Well, Snipping Tool is fantastic like I said. So if you go back to Snipping Tool here, and notice that there’s a nice little button here, called Delay. So if you actually use the Delay feature, you’ll notice there’s a few different options from 1 to 5 seconds. So if I do 3 seconds, and then I’m gonna press New, and then immediately moev to the button to trigger the hover state. So now the hover state has been triggered, and I can just cut here and take exactly what I want to show my friend where he’ll need to click. So that’s as easy as that can be.
So the next way I’m going to show you is the Snip & Sketch tool which is built into Windows 10. This was advertised as the Snipping Tool successor for a time. So I’m gonna go ahead and launch it, it’s available from the Windows App Store. So here what you’ll notice is it has a slightly different interface – I’m going to make it just a bit larger. It has a slightly different interface, okay? When you zoom in, you’re going to see next to the New button, there’s a blue arrow pointing down. That arrow, when you press it, has additional options. So for example, if I press that arrow, you’ll notice that it says Snip Now, Snip in 3 seconds, Snip in 10 seconds. Now, when I press this, the timer is going to start, and I’m going to have to immediately move into position to get into the state that I want. So I’m going to press 3 and then you’ll see I’ll immediately move to the Web Store button. As you can see, triple dots appear, snipping tool kicks in – and by that I mean the Snip & Sketch tool, and then I select these icons, and release and then Snipping – Snip & Sketch appears here and shows me exactly what I took a screenshot of.
As a final note I’ll just say this isn’t always about hover states. There are cases where you’ll need to take screenshots of things that don’t require hovering. Let me show you an example – so I’ll pop open the old Snipping Tool here, so okay let’s say I want to take a screenshot of this. Right? So I want to take a screenshot of where it says “Bookmarks”, okay? So I go here, I go to the Snipping Tool – and hey look, it closed! But I wanted to show that, what do I have to do, do I have to go print screen again, you kidding? No, no. The solution is the same I showed you before. Delay 3 seconds, New, and then you pop open the menu – there you go, the menu stays visible. And then you can do whatever you want – put an arrow pointing to something. And that’s pretty much as simple as it is.
Every now and then, I encounter something that’s the perfect combination of brilliant and ridiculous – this is one of those cases. Check the video below and you’ll understand the brilliant marketing at play. And it’s not fake!
Hi! Welcome to the new MattRefghi.com. To understand the significance behind this re-launch, I need to go back a bit into the past to explain how I got to this point.
Back in 2008, I discovered Jeff Atwood’s blog titled Coding Horror, a blog focused largely about software development. I was working as a web developer at the time, so naturally the topic was quite pertinent and interesting to me, as I was living the subject matter day to day. After following Jeff’s blog and being inspired by the quality of what he offered, in January 2009, I decided that I too would launch a blog. It started with technical posts, but since then, the content has diversified and I’ve since published approximately 250 posts – a mix between written and video content.
Now, the missing piece in the story is that back in 2009-2011, I also created my own PHP web platform in my free time as I learned more and more about web development. I named it Hyperion, and since then, I never stopped working on it. As a result, that platform eventually grew to the point where I began to host it through my corporation and license access to clients. Then came 2021, where I increased my development efforts to a new level, releasing 2 large update packages in a year – altogether bringing forth a bunch of improvements, changes, and new features.
This increase in development is best explained by the fact that I was having fun. And I liked that whatever I did on the side would often also benefit my clients – they too would receive the same updates and improvements. I was also able to pursue features or updates that I personally felt passionate about, which further boosted my productivity. So as 2021 was coming to an end, I had a thought… what if my blog ran on my own software? What if I used Hyperion as a blogging platform?
The first server-side scripting language I learned was ASP, back in my early college days working alongside my buddy Joe. And I remember quite vividly, to this day, how it completely changed my view of the web. Once I “clicked” and understood how those languages worked – I felt like a whole world of possibility opened up to me. I realized I could do almost anything I wanted, I just needed the imagination and the time to design it.
So that’s exactly what I did. What you’re seeing isn’t any old re-launch of my blog, it’s the first time that my content, written in English, is going to be exclusively available on my platform, written in PHP, HTML, JavaScript, CSS, etc. It would be unfair if I failed to mention that I was at least partially inspired to do this by seeing Ye’s Stem Player project.
While I can’t say I was facing any kind of oppression, I did see the immense potential when it came to dogfooding – by turning myself into a regular client of my own platform, I would have even more opportunity to spot areas for improvement, and to come up with interesting new features. And if I wanted to add something to the platform, I could do so fairly easily – because I knew exactly how it was built. And again, my clients would benefit from anything I fixed.
And so that’s the story. At the moment, MattRefghi.com is live, but I’m not fully finished transitioning from the old blog – much like Early Access games, and again, much like Ye, who continues to update his albums after they’ve been released, I decided to release it a bit early as I continued to migrate content and add features. It is nonetheless one of the most exciting chapters in my online presence, and I can’t wait for what’s next.
Note: While I mention Ye twice in this article, I do not condone any form of hate speech. I firmly believe that deep down, Ye has good intentions and simply continues to miscommunicate his ideas… expect an article from me at some point where I explore this.
Update 2025-02-11: I’ve historically demonstrated significant patience in the face of Ye’s mental health issues. There’s a lot to be said for separating the artist from the art – I’ve been very clear when I disagreed with his words and actions. That said, on this day, Ye decided to sell hateful t-shirts on his website. As a result, I have reached my limit – and I will not, and cannot, support someone who takes his hateful ideas that far. I’m deeply disappointed, and can only wish this individual the best in mental health treatment and care.
“So starting with Windows 10, Microsoft got really comfortable with showing ads for apps, games, and, you know, Bing searches, things like that, in Windows. They’re trying to, of course, push their own products, push people to buy stuff in the Windows Store because they get a cut, things like that. So from their perspective they think they are being helpful, they’re offering us these “suggestions,” but personally I find these suggestions really irritating, because I don’t want sponsored content appearing everywhere as I’m working.
So here’s 3 different places where we can turn off these helpful “suggestions,” and I’ll also show you how to keep your lock screen clean in Windows, so that you don’t have like these pop-ups where they suggest things to you before you’ve even logged in.
Okay, so the first step is let’s go to the Start menu here, and I’ll show you that at the top, at the top here there’s normally an ad. There’s not one right now, because it’s not guaranteed that an ad shows up, but the ads are usually for apps, games, so I’ll show you how to make sure that doesn’t happen.
And the way we turn off these suggestions is we click Start, we click the gear here, which is Settings, and now we’re going to do is we’re going to search for suggestions, literally the word “suggestions,” okay? And you’ll notice the first option is “show suggestions occasionally in Start.” So we’re going to click that, and then here “Show suggestions occasionally in Start,” we’re going to turn that to off. That’s the one that appears at the top of the Start menu, that’s what I wanted to… that’s why I wanted to start with that.
Now, we’re going to go ahead and just do a few more of these. So search for suggestions, we’re going to see “show suggestions in your timeline,” just click that, once again, let’s turn this off. Okay? Right here where it says Timeline, “show suggestions in your timeline,” just turn that off.
And now we’re going to do one last search, and this one’s going to be a bit deeper in the list, so instead of just searching and clicking one of the top five options, I’m going to click “show all results,” and all the way at the bottom, there is “turn off suggested content in the settings app.” I’m just going to zoom in real quick, right here. Okay? So I’m going to click that guy, and then once again it highlights the option “show me suggested content in the settings app,” click “off”…. great. So these suggestions are all off right now.
Now the next one I’d like to show you is something that’s harder to visualize, it’s the lock screen, so I can’t really do it while I’m recording, but I’ll show you how to fix it nonetheless. So I go here in my browser – I actually have an image of what it looks like roughly.
So if you see things like this on your lock screen, it’s because you’re using what’s called the Windows Spotlight feature, which is like, a cool kind-of random image that appears on your lock screen, which is your log on screen, you know, before you’re even into Windows, and the cost, if you will, of having this dynamic image is that they sneak in things like this, little ads. So I’ll be showing you how to turn this stuff of, in case it irritates you… I know it irritates me! So let me show you how to do that.
So the way you do this is you have to actually go to Settings again, because of course this is where we do things like this. And we have to locate the lock screen section… which is actually in the Personalization section right here – click this, and they’re going to click “Lock screen,” and you’ll notice I’m set to “Windows spotlight.” So that’s bad to begin with, well [slight laugh], it’s bad if you care about sponsored content. If you like your sponsored content being fed to you in addition to the nice images, then feel free to keep this.
Personally I prefer having a clean start page, so what I do is I actually select one of the other two options, slideshow or picture. Usually I just choose Picture and then I choose any random picture from this list, or I browse for another one.
And here’s the key, here’s where they sneak in the sponsored content… “Get fun facts, tips, and more from Windows and Cortana on your lock screen.” This is the guy. So if you turn that off, you’ve got a clean start screen. Now, of course, you’re missing out on some fun facts and tips, but take my word for it, there’s quite a bit of sponsored content there, and if you have no tolerance for that just turn this guy off, it’s going to improve your life a little bit.
There you go. Now you can enjoy seeing a few less advertisements in your day.”
“Hi everyone. Let’s say you’re working in Excel Online, and you find that you’re not able to see enough of the document at a time.
Alright so, by saying, by Excel Online I mean in the browser, right? So this is an Excel document open in a browser. It looks a bit ridiculous of course because there’s a giant smiley face, but the idea behind this example is that let’s say I need to see many rows of data at a time, and I’m just not able to see them all in the browser… what can I do to improve the situation? In this case we’re just going to use the smiley as an example. What do I do to see the full smiley face? Well there’s a few things you can do, there’s really basic stuff like for example maximizing the window, you know, in Windows, up here, right? That could just maximize it, but often that gives more width than it does height, so it’s not that useful, so for the sake of this video I’m just going to go back to this, to keeping this size.
But, alright, so what else can we do, right? Well, one thing we can do is there’s the ribbon up top here. The ribbon is the area in Excel with all the controls. Well, if you look all the way on the right, there’s a little arrow right here, right? A little arrow, on the right. If you click that, or actually hover over it, it says “collapse the ribbon”. And if you click it, the ribbon actually hides itself, which is great, I mean that removes a lot of space that’s wasted, air quotes, it really depends on whether you need it. So with that space gone, I can scroll down and well, I can see more of the smiley, but not quite all of it.
The next step really that I recommend to solve the situation is to simply zoom out in the browser… that really is the easiest way. So in this case I’m using Google Chrome, I’m going to go to the top right where there’s a triple dot icon up here. Okay, and then I’m going to click that triple dot and then here there’s some zoom options, currently I’m zoomed in 100%, it says, which is no zoom at all, so what I’m going to do is reduce that until I see as much as I need and then I’ll scroll and then perfect, I’ve got the smiley face perfectly in frame.
Now you might ask me, you know, Matt, why didn’t you for example unfreeze the panes that are here? I mean the top five rows are kind of wasted, right, they’re always sticking around. So what I wanted was a scenario where the pane was kind of valuable, and in this case the author of the document, his intention was probably to leave the copyright information always visible because the smiley face itself is actually, you know, a public domain asset, and so that could have been the idea, and yes, I could have easily gone to “View” and then clicked “Freeze Panes,” and then clicked “Unfreeze panes,” I’ll just show you this quickly. You could unfreeze the panes. This would have released the top five rows, and then I could have easily scrolled away and saw more, but that would have changed the document. The other methods that I showed don’t change the document itself, they just change your browser’s configuration.
Anyway so that’s a bit of extra info, hope it’s useful.”
This video is a fresh take on my “Reducing Email Attachment Sizes With Compression” video, posted April 20th, 2011. Since then, things have changed – it was time to revisit it.
As mentioned in the video, I had difficulty uploading the partial 7z files to Gmail as attachments. I’m not sure why – your mileage may vary. 7z would be preferable because it likely has more compression options, and even without instructions I like that searching for “7z” will inevitably lead you to conclude that it’s related to 7-zip whereas “zip” is more of a household term. I’m not sure that all applications that handle zips can handle the multi-volume approach done by 7-zip.
Transcription
“So let’s say you have to send a bunch of files to someone you know, and you really want it to be sent by e-mail. How can you do this? Well there’s actually two main methods I’ll show you – the first involves using compression, the second involves using a cloud service.
So to use compression, let’s open up Gmail here which I’ll be using to test. At the moment that I’m recording this video, Gmail has a limit for 25 megabytes for attachments on a single e-mail. So to get around this, let’s look at this folder we have over here. So as you can see I have a bunch of images here – if I select all them and then look in the bottom left corner, you’ll see that it’s 66 MB. Well, that is more than 25, so how do we get around it? Like I said before, we can use compression. So let’s make sure we have 7-zip installed first. You can download 7-zip from 7-zip.org, and then you just install whichever is relevant to your machine, so whether you have a 32-bit or 64-bit machine and operating system. Once that’s done, you should have a new context menu option, so when you right-click, when all the files are selected, if you right-click, you will see 7-zip as an option, and it will have a sub-menu which includes Add to archive and a bunch of other stuff. Okay? In my case, I care about Add to archive, so I’m going to redo that… Add to archive.
So on this screen there’s two things you need to be careful of. First is the archive format – by default, the archive format is probably going to be 7z, right now it’s set to ZIP because it knows I prefer that. With 7z Gmail gets a little concerned about it and doesn’t let you attach it. ZIPs, it doesn’t mind. So I’m going to set it to ZIP.
The next thing that’s really important here is the split to volumes, bytes section. This is the magic that I wanted to show you. Since we have 66 MB of files down here, if we were to select 10 MB here, notice that there’s a bunch of other options, you know, for the size of a CD and a DVD, but let’s say we select 10 MB here, and I click OK. So what it will do at that point is create multiple compressed files, each of which contains a maximum of 10 MB, but in this case, 10 is not so much what we want, right, because we’re dealing with a limit of 25… so to be safe, I’ll do… 24. And then what I will do is just press OK. Now the key of course is making sure that we followed the right format, so 24 M, 10 M, yep, that’s pretty consistent, we’re using their language. And I’m going to press OK.
Just wait a little bit… and there we go. Three files were created. Now here’s the magic. One of these files by themselves is not very useful. The three of them together? That’s great, and you’ll see why. Let’s create a new folder here, called test, and copy your three files into that folder. Now, when we right-click these files, select 7-zip, and select, in this case, extract here, because I don’t really care where it’s extracted, I just want to see the files. 7-zip magically rebuilds all these images that were compressed into it. And yet each file is actually under 25 MB, and because it’s under 25 MB, let me go back to my original folder… so if I grab this first file and drop it here, in my e-mail, you’ll notice that it is uploading, and it will successfully finish uploading. At that point I can send it to whoever I want, whatever I want, so I can send the first e-mail like this, create a new e-mail, attach 002 and repeat until all three files are gone, and just make sure that the person has 7-zip, and then I can tell them how they use 7-zip to extract them. So that’s the first method which involves using compression.
The second method is much more modern. Let me start by just getting rid of this… okay. So the next method involves going into our folder, let’s delete these files, and instead of using the compressed files, we’re going to select everything that we have here, which is more than 25, remember, it’s 66. And we’re going to drop it right here. So you’ll notice a new pop-up, “Large files must be shared with Google Drive,” this is the second option, it’s more of a modern option. So Google is offering automatically to take your files and stick them in Google Drive and create a link, so I’ll say okay, got it. And then you can see, that it’s just going to start working on uploading everything, and at the very end all I’m going to have is a nice neat link. Now, you might not want to do this, which is why I show two methods, but personally I find this is a very convenient way to do it. As you can see, all of the files have been attached, we can even try clicking one of them, and prove that the image is in fact visible.”
“Hi everyone. In this video, I’ll be showing you how to convert old Office files into their newer formats. So by old files I mean the DOC extension, the XLS extension, or the PPT extension, how to convert those into their X equivalents. So DOCX, XLSX.
So what happened is, in Office 2007, Microsoft introduced these newer formats, the X formats, so it’s possible that when you encounter old Office files, that you sometimes have to convert them to the newer formats – there’s a number of reasons why you’d want to do this, but let’s say you need to do this.
Let’s start the Word document, let’s open it up. Once it opens up in Word, it’s actually really simple to convert – top left corner, you’ll notice that there’s a File menu, click on that, and then you can click “Save As,” again on the left, and then you can click “Browse,” in this case I want to click Browse because I want to choose where my file will be saved. And this is definitely the folder where I want to save it.
So here’s what you need to notice. Underneath the filename you’ll see it says “Save as type,” right? So save as type is currently set to Word 97-2003 Document (*.doc) – we need to change that. So what I’m going to do is I’m going to click on the “Save as type” dropdown, and I’m going to select the first option “Word Document (*.docx)”, that’s what you need to select – Word Document, and it ends with DOCX. So I’m going to select that, and then I’m just going to press Save. It’s really that simple, it did the conversion.
You might also get a pop-up saying hey, you’re being converted to the new format, that’s fine, you can click OK to that. Just be mindful if there’s any other pop-ups, something that says like oh there’s been an error in the conversion, something went wrong, that you have be more careful of, but in general Word does a pretty good job unless you’re dealing with complex documents. So we’re going to save this, close it. And as you can tell now, I have two files, I have the DOC and I have the DOCX. Pretty simple.
Now, I can do the exact same thing with the PowerPoint file and with the Excel file. So just for the sake of the exercise, I’m going to open up the Excel file, and we’ll do the same thing. Here’s the file, I’m going to go to the top left, I’m going to click File, I’m going to then click “Save as,” I will click Browse, and here it says Excel 97-2003 Workbook – that’s nice, but that’s not what we want, so we’re going to change it to where it says “Excel workbook,” which ends in XLSX, the new format. And then we’re going to press Save. And that’s it – you can even see up top right now, the extension is XLSX.
And that, is how you convert Office files. The procedure will be the same for PowerPoint, other files from Office. And I would just say in general, be mindful of error messages that come up when you do the conversion, but if your document isn’t too complicated, you probably won’t have error messages. So that’s it, hope this helps.”
It’s been a while now that I’ve been observing the news, especially those written by Canadians outlets. And one thing that gets on my nerves from time to time is when I see articles written with a heavy Canadian bias in relation to world affairs. Consider a CBC article from today, as an example:
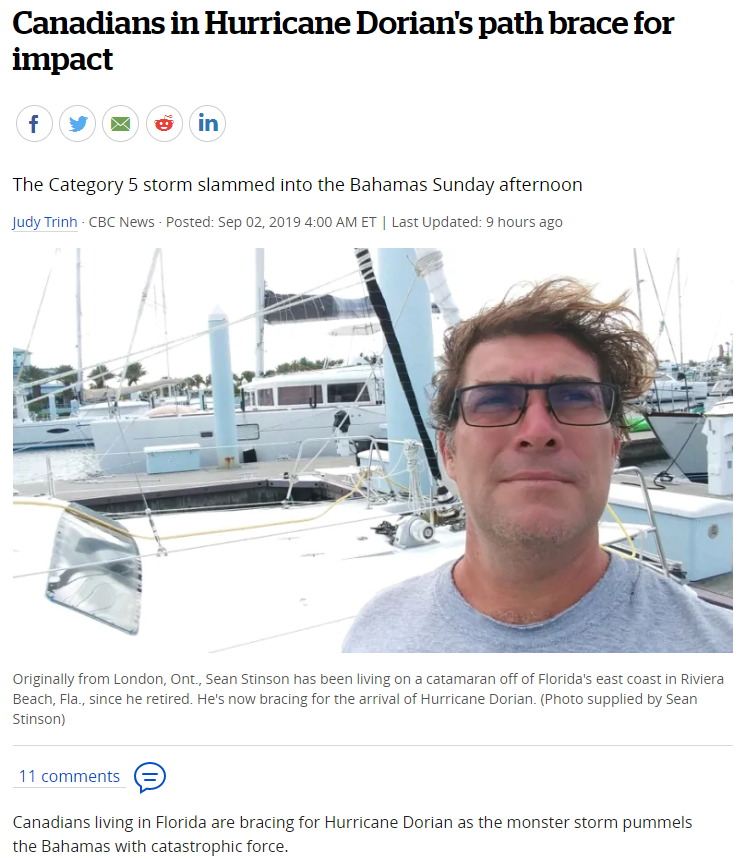
“Canadians living in Florida are bracing for Hurricane Dorian as the monster storm pummels the Bahamas with catastrophic force.”
Yes, let’s focus on the minority of Canadians bracing for impact rather than the massive numbers of Bahamians and Americans facing that same danger – that’s a great idea. The news of Hurricane Dorian makes me immediately concerned for everyone affected…. whether they are from the United States, the Bahamas, or Canada is completely irrelevant. I consider it even a bit insulting that such an article would focus on Canadians when they are mere pebbles in a sea of affected humans. Are Canadians worth more, CBC, by simple virtue of being Canadians? Must you explicitly mention that Canadians are affected to elicit an empathic response in your audience? Or is this an attempt at making Canadian citizens feel like even they, as individuals, have a chance of appearing in a CBC post one day? (The fact that the CBC is a federal crown corporation is not lost on me.)
Though I can’t speak to exactly what they were thinking, I’m guessing that this was simply an attempt to capture a different type of reader – but if that’s the case, count me concerned. Regardless of borders, we, as humans, are all in this together. This type of article emphasizes our differences during a moment where they are especially unimportant. And because of that, in my mind, this article does more damage than good.